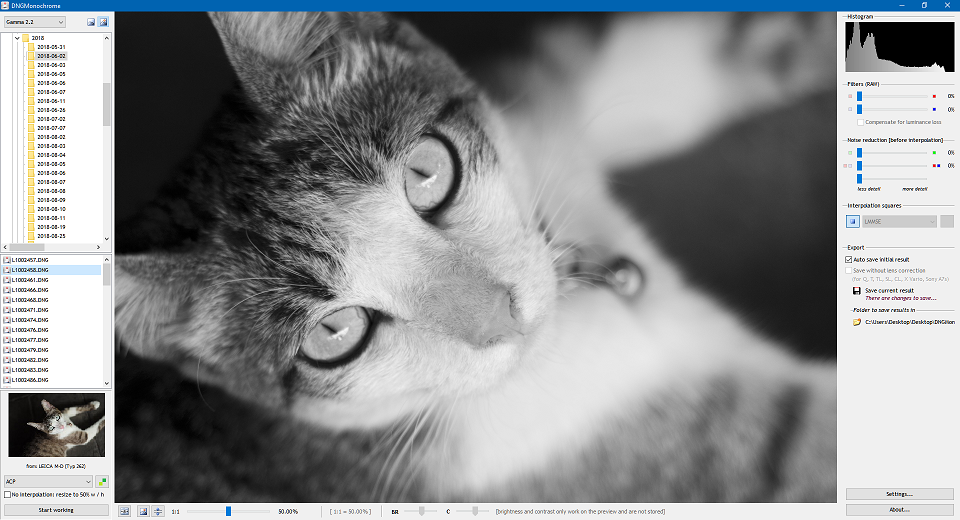
DNGMonochrome converts color DNGs into full-blown monochrome DNGs. Mainly developed for Leica, DNGMonochrome can also handle DNGs from Ricoh (GR III and GR IIIx), Sigma (fp and fp L) and Pentax (K-1, K-1 Mark II, K-3 Mark II, K-3 Mark III and 645Z) and from selected Canon, Nikon, Sony, Fujifilm and Olympus cameras if you first convert the RAW file to DNG.
DNGMonochrome does not support all cameras. See the camera list a bit further down. If your camera is not on that list, converting the RAW to DNG will not help.
Since version 1.8.0 DNGMonochrome can also turn scanned negatives (shot with a supported camera) into positive DNGs (note that color negatives will be turned into B&W positives - for color negatives to turn into color positive DNGs I'm working on a separate program). See a few paragraphs down to read up on it. For users not interested in this functionality, keep the top left selection on 'Regular'.
DNGMonochrome is designed on and for Windows 10 & 11, but also works fine on Windows 7 (most likely also on Vista / Windows 8, but was not tested on those platforms).
The monochrome result DNGMonochrome produces (when no filters are used), is based on the luminance portion of the sensor, under the assumption that interpolating based on luminance, without full color interpolation, leads to better results (resolution, sharpness, color noise) than a color interpolated result turned black & white. If this assumption is actually correct is still open for debate - let me say that after developing by now many iterations of this software, I have my doubts. I do like the end result from a purist point of view though, knowing for sure it's the closest I can get to a 'true' monochrome result from a color camera.
For the full back story and a more technical explanation of the ins and outs, have a look
here.
In addition, DNGMonochrome can also interpolate directly on the red or blue channel and use these results - mixed in with the regular luminance result - to create filter effects.
DNGMonochrome offers several algorithms for interpolation, an extensive module to battle green divergence, and can interpolate selections of the photo with different algorithms (yes, you can interpolate one photo with one, two, three or four algorithms, all in the same photo - I do believe that's a first and a bit nutty).
DNGMonochrome uses the same viewer as used in
Falaphol. It means you can zoom in and out (up till 800%), move the photo around, and overall get clear view of the conversion.
On the sliders
The brightness and contrast sliders at the bottom of DNGMonochrome are purely visual and only work on the preview image. Changes you make with them are not stored in the DNG. The histogram also doesn't react to them. They are reset to neutral when you start a new conversion.
The sliders on the right (color filtering, highlight recovery and noise reduction) are stored within the DNG. So if you make changes with any of those sliders and do a new save, the underlying raw data will have changed.
As a rule of thumb: changes you make on the right are saved in the monochrome DGN. Changes anywhere else in the program (bottom or top left) are purely visual and have no effect on the saved monochrome DNG.
On noise reduction and sharpening
The effect of red and blue noise reduction in DNGMonochrome is minimal. It's very difficult to see, unless you have used the color filters. Not illogical, since the reds and blues are replaced by greens. However... all the algorithms (LMMSE especially) - except Bicubic - do use the red and blue plane to determine what the greens should be on a red or blue sensel. So despite red and blue being scrapped in the end, they aren't useless to the algorithms (and thus noise reduction on red and blue can have an effect). Noise reduction on the luminance has a bigger effect. But realize: once the noise reduction is baked into the conversion, you can't get rid of it in your RAW converter. So I would advise handling the luminance noise reduction in your RAW converter.
There is no sharpening in DNGMonochrome. That's really something for your RAW converter. Just be aware that these conversions seem to fare better with less sharpening than a color DNG. I noticed the default settings for my color photos in Lightroom are usually too high for the monochrome conversion.
On turning negatives into positives [since version 1.8.0]
Since version 1.8.0 DNGMonochrome can convert a photographed negative (scanned with a camera) into a positive monochrome DNG.
I recently started scanning my older negatives (color and B&W) by photographing them. However, the workflow to edit the negatives was cumbersome. When bringing the scanned negative into Lightroom and flipping the tone curve to turn the negative into a positive, all the sliders work reversed. Pushing the exposure-slider leads to less exposure. The whites slider works on the blacks. The blacks slider works on the whites. The shadows and the highlights? I don't know, just very confusing. You get used to it, but it's a pain. I then tried the very good Negative Lab plugin, but apart from its own sliders working fine, when going back to the Lightroom sliders, things are still reversed.
I then realised what I needed was a positive DNG: flip a DNG representing the negative into a positive. Mind you, cause I can be a bit slow, most likely saving the flipped result as a 16-bit tiff would also have worked, but when I discovered that possibility I was already too enthusiastic about my new idea.
And that's exactly what DNGMonochrome is now capable of
(to get to this part in DNGMonochrome, select top left: Flip).
It can take the photo of the negative and produce a positive monochrome DNG. When that one is loaded into Lightroom, the sliders work as intended. Due to the nature of the software, this 'negative' part of DNGMonochrome can also flip positives into negatives. Fun, but hardly useful.
First of all be sure to be in the right setting at the top left as to avoid confusion. 'Regular' will expect a positive color DNG to turn into a positive monochrome DNG (as the program was up till version 1.7.7). 'Flip' expects a DNG of a negative (color or B&W) to turn into a positive monochrome DNG (
but since DNGMonochrome can't tell the difference between a positive or a negative, if you load a positive into this part it will turn into a negative).
Obviously this is mostly useful on B&W scans, since DNGMonochrome produces a monochrome DNG and not a color one. But if you want to turn your color negative scans into B&W positives, DNGMonochrome can do that too.
I am also working on a color version (producing a positive color DNG), which then will be a separate program. Obviously that's a bit more challenging. No time line given but it's currently working fairly well.
One limitation, since the same procedure as for a color DNG applies: your RAW file (the scan of the negative) needs to be turned into a DNG first and the camera you shot the negative with needs to be supported by DNGMonochrome.
To give you an example of my workflow: I shoot a B&W negative with a Canon RP. That produces a file of the B&W negative in .CR3 format. I then convert the CR3 to a DNG with Adobe DNG Converter. I then load that DNG into DNGMonochrome, select on top 'Flip', select my interpolation algorithm and let it run. The positive is saved as a monochrome DNG (so as a bonus I lose the color information from the original CR3, but that's what I want, since it's a B&W negative - color is only confusing at this point). I then load the positive into Lightroom for editing as if it was a regular monochrome DNG - which it now basically is - and all the sliders work as intended.
This part of DNGMonochrome is not meant to produce a perfect positive scan. Although I've added some options to get close, it's not meant as a 'one click and here's your photo' (try Negative Lab if you want that). You will always have to edit the end result in a full blown RAW converter (e.g. Lightroom). The initial result should be a rather flat RAW image. The options you then have is a slider for adjusting the mid point (this makes the total image darker or lighter) and options to rotate and mirror the DNG (left / right / vertical / horizontal). A second option - to get a lot closer to a possible 'good' end result) is to remap the data and expand it. This gives you a more contrasty image but with the risk of clipping. You can then bring down the whites or up the blacks until you're satisfied.
For some examples (from negative to positive) see the screenshot section.
All the edits you make to the positive DNG are stored within it. So if you do change the orientation, you'll see it back when you import the DNG in e.g. Lightroom. The aim was to get to an acceptable positive DNG and use it as a starting point for further editing.
Supported cameras
DNGMonochrome currently supports native DNGs from:
o Leica M8
o Leica M9
o Leica M (typ 240 / 262)
o Leica M-D (typ 262)
o Leica M10
o Leica M10-P
o Leica M10-D
o Leica M10-R
o Leica M11 [only in the 64-bit version]
o Leica M11-P [only in the 64-bit version]
o Leica M11-D [only in the 64-bit version]
o Leica Q
o Leica Q2
o Leica Q2M [at special request, to be able to save the already monochrome DNG without lens correction]
o Leica Q3 [only in the 64-bit version]
o Leica Q3-43 [only in the 64-bit version]
o Leica S2
o Leica S (typ 006)
o Leica S (typ 007)
o Leica S3 [only in the 64-bit version]
o Leica SL
o Leica SL2
o Leica SL2-S
o Leica SL3 [only in the 64-bit version]
o Leica SL3-S
o Leica T
o Leica TL
o Leica TL2
o Leica CL
o Leica X Vario (typ 107)
o Leica D-Lux 8
o Pentax K-1
o Pentax K-1 Mark II [only in the 64-bit version]
o Pentax K-3 Mark II
o Pentax K-3 Mark III
o Pentax 645Z [only in the 64-bit version]
o Pentax MX-1
o Pentax Q
o Pentax Q7
o Pentax Q10
o Pentax Q-S1
o Ricoh GR III
o Ricoh GR IIIx
o Sigma fp
o Sigma fp L [only in the 64-bit version]
And after converting the RAW files to DNG (e.g. with Adobe DNG Converter) also from:
o Leica V-Lux 5
o Leica D-Lux 7
o Canon EOS 250D
o Canon EOS 350D
o Canon EOS 400D
o Canon EOS 450D
o Canon EOS 500D
o Canon EOS 550D
o Canon EOS 30D
o Canon EOS 40D
o Canon EOS 50D
o Canon EOS 60D
o Canon EOS 70D
o Canon EOS 80D
o Canon EOS 90D
o Canon EOS 1D Mark II
o Canon EOS 1D Mark III
o Canon EOS 5D
o Canon EOS 5D Mark II
o Canon EOS 5D Mark III
o Canon EOS 5D Mark IV
o Canon EOS 5DS [only in the 64-bit version]
o Canon EOS 6D
o Canon EOS 7D
o Canon EOS 7D Mark II
o Canon EOS RP
o Canon EOS R10
o Canon EOS R8
o Canon PowerShot S50
o Nikon D1
o Nikon D2X
o Nikon D3
o Nikon D3X
o Nikon D4
o Nikon D4S
o Nikon D5
o Nikon D6
o Nikon D200
o Nikon D300
o Nikon D300S
o Nikon D600
o Nikon D610
o Nikon D700
o Nikon D750
o Nikon D780
o Nikon D800
o Nikon D800E
o Nikon D810
o Nikon D810A
o Nikon D850 [only in the 64-bit version]
o Fujifilm X-T100
o Fujifilm X-T200
o Fujifilm GFX 50R [only in the 64-bit version]
o Fujifilm GFX 50S [only in the 64-bit version]
o Fujifilm GFX 100 [only in the 64-bit version]
o Fujifilm GFX 100 II[only in the 64-bit version]
o Fujifilm GFX 100S [only in the 64-bit version]
o Fujifilm GFX 100S II [only in the 64-bit version]
o Fujifilm GFX 100RF [only in the 64-bit version]
o Olympus OM-D E-M5
o Olympus OM-D E-M5 Mark II
o Olympus OM-D E-M5 Mark III
o Olympus E-300
o Olympus E-500
o Sony A850
o Sony A900
o Sony A1 [only in the 64-bit version]
o Sony A7
o Sony A7C
o Sony A7C-II
o Sony A7C-R [only in the 64-bit version]
o Sony A7R [only in the 64-bit version]
o Sony A7R-II [only in the 64-bit version]
o Sony A7R-III [only in the 64-bit version]
o Sony A7R-IV [only in the 64-bit version]
o Sony A7R-IVA [only in the 64-bit version]
o Sony A7S
o Sony A7S-II
o Sony A7S-III
Once more to avoid confusion: DNGMonochrome only supports the cameras mentioned in the list above and does not support Canon, Nikon, Sony, Fujifilm or Olympus native files. You have to convert them to DNG first. Google 'Adobe DNG Converter'. And note that DNGMonochrome expects the full RAW (converted to DNG), not a downscaled version. Those are untested and if they work, you're lucky. Also, if your camera offers compression, compressed files converted to DNG might produce results in DNGMonochrome that look horribly underexposed. Scroll up a bit and read the paragraph 'on compression' on how to solve this.
All the monochrome DNGs converted from the cameras in the list were tested by me on DNG import in Lightroom. So I can guarantee the monochrome DNG works in at least one RAW converter. Your favorite RAW converter - other than Lightroom - might not be so cool. I have not tested any of the produced monochrome DNGs in any other converter.
You can also use Falaphol to view the monochrome and converted color DNGs. Falaphol can handle monochrome DNGs produced by DNGMonochrome, even if the camera wasn't a Leica, since version 1.7.0. And since version 1.8.0, Falaphol can also show your converted color DNGs for all the supported cameras (however, Falaphol usually runs a little bit behind in development... the color version of the DNGs from recently added cameras in DNGMonochrome might not yet be supported in Falaphol...).
If your camera is not on the list and you really want it to be, you can write me an email here on ememsoftware@gmail.com and file a request for it (please be specific about the camera type, brand, model etc.). I can't guarantee your camera will make the list, but I'll try.
A quick note on the Sony lens correction
This was a bit of a headache, because the conversion in Adobe DNG Converter (from Sony color RAW to color DNG) did seem to store the lens correction information in the expected exif tag (since Lightroom presents the converted color DNG with lens correction). But after some digging, it turns out the lens correction on the Sony cameras is a two step process: there's the small correction of the red and blue plane (to correct chromatic aberration - quite useless in DNGMonochrome), which is stored within the DNG exif, and then there's the bigger distortion correction (barrel, pincushion etc), which is stored as XMP tag in string format. More as a 'whomever might be interested in this'. Lightroom applies the chromatic aberration correction automatically (built in the DNG), but the distortion correction is only applied through switching on the lens profile (contrary to the Leica DNGs for cameras that use distortion correction... Leica stores that correction in the exif).
This is all fine, since the correction written in the XMP tag is similar - when applied - to the one applied by the lens profile. However, for some reason the monochrome DNG for Sony does not switch on the lens profile automatically in Lightroom (the color DNG does - but that might be a standard import setting on my Lightroom). That had me confused for a while. So please note that
for lens correction to work on the monochrome Sony DNGs, you have to switch on the correct lens profile in Lightroom. I did experiment with writing the distortion information (from the XMP tag) directly into the Sony exif, together with the other lens correction information. That actually works too in Lightroom. The distortion correction is then applied immediately, but the vignetting correction isn't. And you can't apply the lens profile if the distortion correction is already applied, because then the photo gets really messy. So I decided to leave it like this.
Meanwhile, in
Falaphol, which can now also handle these selected Sony DNGs, things are equally confusing. The older DNGMonochrome did not preserve the right XMP tag, necessary to apply lens distortion (remember, it's not in the exif to be automatically applied by the Adobe code). So only monochrome DNGs produced with at least version 1.1.0 (for Sony) will show with lens correction in Falaphol.
Further reading
If you want to read up on some more inside information (I do encourage you to do that, since especially the subject of green divergence can make or break the conversion) have a look
here.