M9Tether can trigger the M9 by changing brightness measured by a webcam (version 2.1 or higher).
I mainly designed this feature for experiments with lightning.
This feature relies on DirectX (more specifically DirectShow) so some version of DirectX should be installed. With the intended platforms for M9Tether (Windows 7 or Vista) this should not be a problem, because I think DirectX comes with the installation of the OS. If not, DirectX can be downloaded for free from Microsoft (note that of this writing the current version of DirectX is 11). Microsoft keeps changing its rather chaotic download sites, so I don't provide a direct link here.
Please note that my resources to test complicated features like this one are limited. It works on my system (Windows 7), and it was tested on a Vista laptop with success, but in the mysterious world of computers and software - let alone webcams -, that's hardly a guarantee. Let me know if you experience problems with it (see the 'Contact' section on the main page).
Starting up
To get the trigger to work, start up M9Tether and click on the 'Light...' button. A separate window opens.
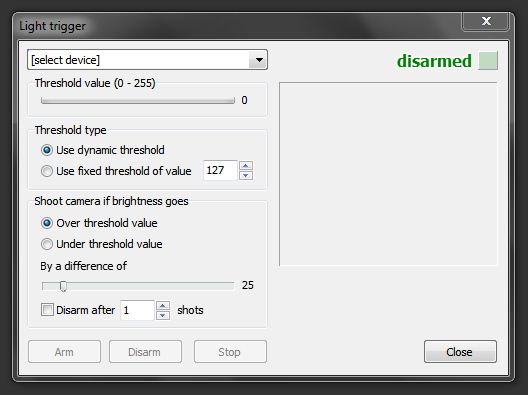
On top of the window you'll find a drop down list displaying [select device], which should list your webcam if one is connected or built in (click on the down arrow to display the whole list).
Select the webcam from the list and it should start working after a short while. If it does, you'll see the image it produces on the right hand side of the window.
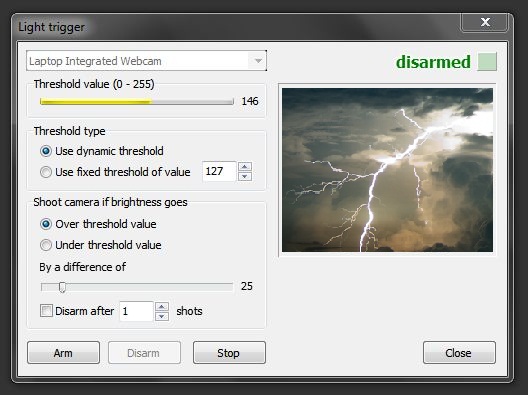
Under the heading 'Threshold value' you will see a yellow indicator, showing the current brightness level. This indicator will adapt when brightness changes. It measures the light in the middle of the webcam image and will fluctuate with changes in brightness.
The second heading below that is 'Threshold type' and this one is used to indicate how you want the trigger to behave. I'll come back to that one in a minute.
The third heading is called 'Shoot camera if brightness goes over/under' and here you can indicate if the camera needs to shoot when the brightness increases or when the brightness decreases. It also contains a slider where you can set the amount of extra (or less) brightness that needs to occur before a picture is taken.
In the default settings, the camera will shoot if the brightness the webcam registers increases by a value of 25. If the threshold is 145 (it will fluctuate a bit) the camera will shoot if the brightness level hits 170. Note that the brightness needs to increase suddenly. If brightness slowly increases every new value is simply taken as new threshold value in the above settings. It needs a sudden jump.
Arm and disarm
On the top right of the window you'll see the text 'disarmed' and a green square. This means the trigger is not armed, and the camera will not shoot, even if the set conditions are met (so even if the brightness goes 25 points over the dynamic threshold, the camera will not fire). However, you can see that - were the camera armed - it would shoot, indicated by the green block turning red. So in 'disarmed' state, you can test your settings in the environment you're in, without actually firing the camera, deciding first on the proper settings and using the green square to see whether the camera would start shooting in an 'armed' situation.
Click on the 'Arm' button at the bottom to actually 'arm' the trigger. After this, the threshold indicator will turn red and the 'disarmed' text will change to a red 'armed'.

Threshold type
Under 'Threshold type' you can indicate if you want to use the dynamic threshold value or set your own 'fixed' threshold value. If you use the dynamic one, the camera will fire only once when the webcam detects a sudden increase or decrease of brightness. After that, the dynamic threshold will have adapted to the new brightness level (the level that triggered the shot), and the camera will then only shoot if the brightness level goes up again (or down - depending on the under or over settings). This setting is mainly handy when you're only interested in the change from dark to light or v.v.
For example, if you use this setting to trigger the camera on your household light switch, and you leave the light on, the camera will shoot only on the moment the light comes on. If you leave the light on, no new photos will be taken, because the dynamic threshold will have gone up. You need to go again 25 points above that new threshold (add more light) for a second picture.
Use the 'Use fixed threshold' setting if you want the camera to shoot continuously as soon as brightness goes up and stays over the fixed value.
In the above example - with the light switch - the camera will start shooting as soon as it detects the light. And because the light levels stay above your fixed threshold - if you do not turn the light off - the camera will keep taking pictures (until you turn the light off again). Easiest way to use this one is to fill in the value indicated by the dynamic threshold (the yellow/red beam) once the brightness level of your environment is settled and the dynamic threshold has found a stable value.
Webcams do have a habit of adapting quite strongly to the light available, so you might want to take that into account when deciding how big the difference needs to be before a photo is taken (set with the slider under 'Shoot camera if brightness goes under/over').
Other options and buttons
Use the 'Disarm after # shots' setting to disarm the camera after it has taken the desired number of photos.
Click the 'Stop' button to stop the webcam from operating. You can select it again from the drop down on top.
Click the 'Close' button to stop the webcam and close the window.
Some details
The dynamic threshold indicator (the yellow/red beam) will lag behind the actual brightness. To prevent it from fluctuating too much, it's updated only once a second, and the presented value is based on an avarage value of the lows and highs within that second. This means the cam might register short light changes, which aren't reflected by the threshold indicator. This is not a problem, because internally the camera will still react on it by taking a picture.
If your webcam has additional sofware for settings, it's best to turn off enhancements like face recognition, auto zooming, backlight compensation etc. A low contrast setting and less color also helps in stabilizing the dynamic threshold, because a webcam image is kinda low quality and can contain a lot of noise. The more stable the dynamic threshold, the bigger the chance of a good reading when the actual brightness of the scene jumps.
The point for measurement of brightness is based on one pixel taken from the middle of the webcam image. I haven't had a chance yet to test this all outside. If it turns out the one point is too limited I might extend this window with the option to place (or turn on) extra points on the image, e.g. four extra points in the corners.
Obviously the reading isn't instantanious. When the light hits, there needs to be processing done, and if the flash is very short, the camera will most likely miss the flash itself. There will alway be a slight lag between the measurement and the camera firing - although I did my best to keep it as fast as possible - so how useful this addition is to you I can't say. From my own experience, with trying to capture lightning, I'd say the 'computer/camera combo' is faster than the 'my brain/my index finger/camera combo'.
Click here to go back to the main page.
See also the blog